Showing posts with label DIY. Show all posts

Wednesday, November 26, 2014

Cute Stocking Idea

Since it's Christmas time I made my boyfriend a easy DIY stocking for his job

Artsy Fartsy Needs: the deign (reindeer), paint, stocking, paint brushes, hot glue gun, pipe cleaners, and scissors 

I saw this design and thought it would be nice on his red stocking


Start with a half C looking thing that will be the face.
Make sure you leave a gap for the red nose.


The to make the antlers are just lines.
They look the same on both side.
Don't go too crazy on the little antlers because you don't want too much on it


Next you should cut the pipe cleaners into 4 like so


Then take two of them and cross them over like a T


Make two T's and cross them over to make this.
To get the little ones on top you'll need to cut the pipe cleaners more.


So take another pipe cleaner and cut them into 8


I wanted to make another snowflake but not the same
so I used only 3 of the 4 and crossed them over.
Then I took the last one and cut it in half and used it for the little ones on the sides.


I took the hot glue gun and glued down the two big snowflakes


Like so.
And I also made a small one that's on the top corner.


Put little black dots for the eyes and the wrote "Let it Snow"
I had my boyfriend write his name so that he can at least say he did some of his stocking :p


I was petty happy about how his stocking turned out!

Happy Holidays!  


Friday, November 21, 2014

Olaf Cup

Im tired of having to pay extra money at color me mine for my DIY cups so I wanted to see if I could make them at home! 

Artsy Fartsy Needs: a cup, sharpies could work but I used these, and a oven 


For this project I wanted to make Olaf because he's the cutest Disney character!!


Start with some basic shapes for his eyebrows, eyes and nose


Then color them in with your pretty markers


Instead of saying "I like warm hugs" I made him say "I like warm coffee" 

After that you'll put it in the oven to bake
I'm sorry but his eyes ended up not staying so I'll update later on the perfect temperature and how to put it in the over but I think my problem was that I didn't let him dry the whole way

Thursday, October 30, 2014

Elephant and Giraffe Painting

For my friends birthday I wanted to make her a painting so I did.
She likes elephants and I like giraffes so I painted them both in a heart like shape

Artsy Fartsy Needs: Canvas, paint, paint brushes, pencil and paper. 

In order for me to draw I need to look at something to copy it because it's easier for me.
So I found this picture of giraffes and the elephant to copy.


My super secret tip on how to draw/paint something that you can't is to copy it from your computer.
I take a piece of paper and put it up to my lap top screen, have the picture I want to trace up on the screen, turn the bright up the whole way and then trace the picture onto paper with a pencil so I don't leave a mark on my computer.


After I have it traced on the paper I need to get it on the canvass, 
I take the paper with the picture and trace the picture with a sharpie over the canvass
the sharpie will leak onto the canvass and leave a faint outline.
After that I'll paint over the lines so it goes away and at the same time filling in the picture.
After that I got this!

I wish I would have realized that it would have been such a white background ahead of time.
Since I wanted the background blue it made it difficult to go around the animals 
so if you do this make sure you know what you want your background like before you start.
I did a tree on the side which was easy used different types of brown stroked to make the tree
then use a rough brush to make the leaves.
After that I was setting up how big I want my quote to be.

When I figured out how big I want the quote I wrote it nicely on a white paper, like a cloud,
then used mod podge, that you can get from michaels, to put it on the canvass.


Monday, October 27, 2014

Hakuna Some Vodka DIY Drinking Shirt

When I turned 21 I went to Vegas but before I went I wanted to make a drinking shirt

Artsy Fartys Needs: a shirt, paint, paint brushes, stencils and drinking quote


I loved the drinking quote "Hakuna some vodka, it means get wasted" 
So I set out to find a Lion King shirt and I found this one a forever 21


I used my stencils and made each letter go one way and another to look uneven
After painting the letters yellow I outlined it in black
I then carefully wrote "it means get wasted" my hand


I thought there was some empty space so I panted a sun on the side. 
I got so many complements on my shirt and it's so easy to DIY!

~HAKUNA SOME VODKA~

Sunday, September 21, 2014

Baby Shower Motorcycle

This will be a long one because I'll go step by step on how to create a motorcycle made out of all baby stuff, a perfect gift for your next baby shower!

I want to give credit to http://www.sweetaprils.com for giving me the step by step tutorial to do this! 
(If you want to see more examples go there) 

Your arty fartsy needs are: 34 diapers Pampers Swaddlers Size 1 (17 for each tire), 8" cake pan, 3 rubber bands, 2 receiving blankets (30x30 approx), 2 bibs, a pair of socks or mittens, a baby bottle, 1 washcloth, scissors, pins, a stuffed animal (size approx between 15" and up to 20"), and decorative ribbon.   


First you will have to make the tires by putting the diapers into the cake pan.


When you use all 17 diapers the tire will then be ready to put the rubber band around. 
I used some extra large rubber bands laying around the house that was perfect for it but you can use normal ones too.


You fold the receiving blankets in half then fold them up like the picture bellow.


You first put one of the blankets through both of the tires to secure them together, you will have to pin them down to each other as you will later see.


You want to make sure the ribbon is on the tires before you secure them down!! 
I pinned the ribbon to the diapers and then put that part on the bottom so no one can see.


Pin the blanket down like this.


Afterwards you'll want to pull the other blanket through the first tired for the handle bars.


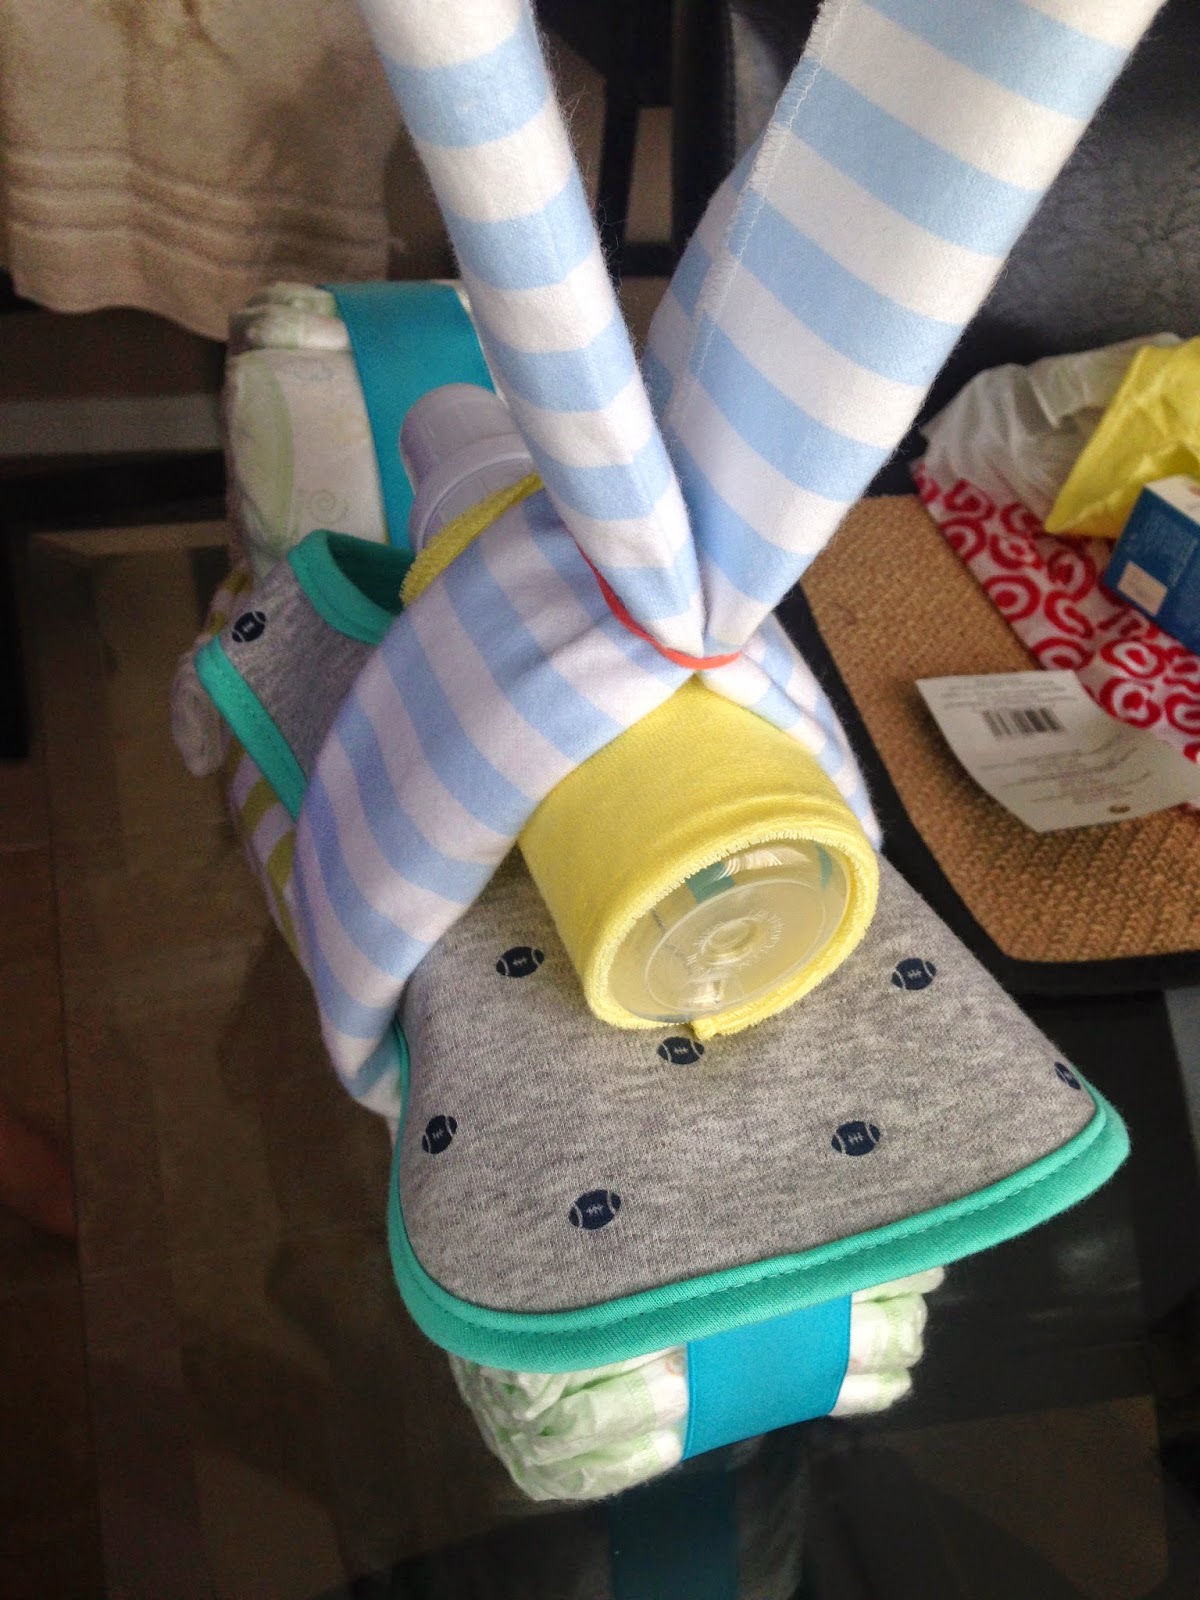
First put the bib on top of the tire, roll up the wash cloth around the bottle, take the blanket and secure it with a rubber band (sweetaprils said to use a chain link toy but I didn't want to buy that). After I put the rubber band around it, the blanket was flopping over so i tied a bow around it which helped it stay up. 


To keep the handle bars stiff I put half of a toilet paper roll in the blanket.


You could roll up a wash cloth or use tissue paper to stuff the socks but there was enough blanket left over for me to not need to do that. 


This was the bow i made to help the handle bars stay up.


Tada!!


I took the ribbon I had left to make this bow for the bear. 
I stuck a pin in the bow then wrote the to and form and pinned it on him. 
So perfect of him!